Friday, August 7, 2015

Traintime in Durango

D&RGW K-28 473 is my favorite locomotive.  Therefore, I am presenting for your enjoyment three photos of this locomotive in service on my new layout.  The locomotive is a Westside Model Company import, which I painted, weathered, and installed a SoundTraxx Tsunami sound decoder.


D&RGW 473 is preparing to lead an oil train out of Durango.

D&RGW 473 in Durango with RGS 461 in the background.

D&RGW 473 preparing to leave Durango with an oil train.

Dolores Colorado CONOCO Oil Plant

I have recently completed a Ragg's...To Riches? kit for the CONOCO Oil plant located in Dolores, Colorado.  I followed the instructions in the kit, and found that the kit went together well.  I did use a larger base than the instructions indicated.  The instructions stated that the warehouses, platforms, and tanks would need a space of approximately 6 x 15.5 inches.  I used a larger base, at 11 x 18 inches, as I added the spur track to the model.

I used Rust-Oleum Clean Metal Primer, as recommended in the instructions, to paint all of the corrugated aluminum.  This is the final color for the siding, but the corrugated material used for the roof was top-coated with Floquil Dark Green.  All other parts in the kit were primed using Rust-Oleum's Auto Primer, which is light gray.  Pan Pastels were used to weather the model.

This is a well-engineered and thought-out kit, with many extra touches included to enhance the modeling experience.  This model will be a focal point in my future Dolores scene.


Overall "streetside" view of the completed CONOCO Oil Plant.

Close-up view of the two oil warehouses and platform.  Note the oil-filling pipes in the foreground, at the edge of the platform.

A view of the four oil storage tanks, and catwalk.  The tanks were painted with Rust-Oleum Clean Metal Primer, and weathered with Pan Pastels to simulate rust in the riveted seams.  I installed ground cover to the base prior to gluing the tank supports and tanks in place to make it easier to get weeds under the tanks, where they would naturally be found.

A close-up view of the larger warehouse.  All corrugated material was first painted with Rust-Oleum Clean Metal Primer.  The roofing was then top-coated with Floquil Dark Green.

A trackside view of the four oil loading tanks.  The track in the foreground is a length of Micro-Engineering Code 55 Flex-Trak.

The trackside view of the two oil warehouses.

An overall aerial view of the completed model resting on a table.  This view shows the relationships among the warehouses, platform, tanks, garage and office.  The garage is the small building in the lower left, with the green roof; the office is the small building on the left side with the dark gray roof.

Another overall view of the Dolores CONOCO Oil Plant.

Thursday, July 2, 2015

Durango Stock Pens Completed

I have finally completed the Stock Pens at Durango, and have installed them in their final location on the spur leaving Durango.  I purchased this Banta Modelworks Stock Pens kit several years ago, and started construction prior to my move.  Along with many modeling projects, this kit had to wait patiently until the time was right to complete it.  In addition to the kit instructions, I made use of the tips that Tom Troughton published on his website, Troughton Modelworks, entitled "Building the Stockpens".

An overall view of the Durango Stock Pens.  Additional "dirting in" of the stock pens is forthcoming.

The wood was stained with Hunterline Driftwood.

Another overall view of the Stock Pens.
 
Close-up view of the chutes.  Note that this is a double chute to allow loading cattle into single-deck stock cars, or sheep into double-deck ones.  The gates swing on hinges, and the extensions are functional.


Rio Grande Southern K27 461 is switching the Durango Stock Pens.

Rio Grande Southern 461 is picking up loaded stock cars to insert into the stock train waiting on the mainline in the foreground.  The RGS stock cars in the foreground were built from Grandt Line kits.

Wednesday, April 29, 2015

Westside C-25 with WOWSound v3 decoder


Monday I replaced the existing Tsunami decoder and anemic speaker with a TCS WOWSound v3 decoder and a new so-called "sugar-cube" speaker.  I replaced the decoder not because there was a problem with it, but because the C-25 has a very narrow tender, and I needed to install a Keep-Alive with the decoder.  I was not satisfied with the sound that I was able to get from the existing speaker, so I obtained one of the very small "sugar-cube" speakers from the Streamlined Backshop.  This is a very small speaker, literally about the size of a sugar cube.  I installed a 13 x 18 mm speaker, which had a 1 watt power handling capacity.  There was plenty of room, even in this narrow tender, for the decoder, the KA2 Keep-Alive, and the speaker.  Once the installation was complete, I tested the locomotive on the layout, and was amazed by the quality and volume of the sound.  I have uploaded a video of the C-25 as it is turned on the turntable and readied for service on the layout.  This video also shows the operation of the turntable using the PTC III controller.


D&RGW C-25 375 entering the turntable in the Durango Yard.  The locomotive is a Westside Models brass import, equipped with a TCS WOWSound v3 decoder with Keep-Alive, and a sugar-cube speaker.


D&RGW C-25 375 being turned on the Durango turntable.  The turntable is controlled by a PTC III turntable controller.


D&RGW C-25 375 has been turned on the turntable, and is lined up for the service track.  It will now readied for service by filling its sand dome, and topping off its load of coal.


The C-25 is positioned at the sand house to receive a fresh load of sand in its sand dome.

The C-25 has topped off its load of sand, and is now ready to pull forward to the coaling tower to top off its coal load.


Wednesday, April 8, 2015

K-28 476 with a TCS WOWSound decoder


I just installed a Train Control Systems WOWSound decoder into my Sunset Models K-28 476. The decoder includes a KA2 Keep-Alive circuit board, which allows the locomotive to continue to run over dirty track, or other intermittent electrical problems.  The decoder has a wire connection to a sound cam, allowing the chuff to be synchronized with driver rotation.  The decoder was set to use the auto-chuff by default, so I checked the TCS website for details on how to enable the cam wire. 

All axles on the locomotive, and two of the four on the tender, were too tight in gauge, causing the locomotive to "bump" its way across properly gauged turnouts.  Therefore, I had to disassemble the locomotive and re-gauge the wheelsets to ensure proper operation.  The result of the work is a locomotive that runs well at low speeds, and has an interesting selection of bells and whistles.

I've uploaded a still photo and a video of the locomotive in action.  The video is only about 1:24 in length.  Enjoy!


D&RGW K-28 476 crossing the turnout leading to the Durango Stock Pens.  The locomotive is a Sunset Models K-28 with a TCS WOWSound decoder with Keep-Alive.  The locomotive has a headlight installed, but still needs a crew.


Monday, April 6, 2015

Durango Turntable Is Fully Operational!

The turntable for the Durango Yard has been installed since track was installed.  However, it had not been powered, or indexed for the new track locations.  This project has now been completed, and trains are able to be turned on the table.  I relocated the New York Railway Supply (http://nyrs.com/) indexing system from my old layout.  I constructed a housing for the keypad, which is located on the fascia near the turntable itself. The controller is mounted on a shelf located under the layout.  This allows access to the controller for re-indexing when necessary.


Westside Model Company D&RGW C-25 375 being turned on the completed NYRS turntable in Durango.  The model has added details, and was painted, lettered and weathered by the author.  The C-25 has a Tsunami DCC decoder and working headlight.  It has just emerged from stall 10 in the Durango Roundhouse.

Another view of D&RGW C-25 375 on the Durango turntable.  Note that the roundhouse roof needs to be secured!

The PTC Model III turntable controller as installed on the author's D&RGW and RGS layout.  The keypad is located in an angled housing, making it easier to read while standing in the aisle, and the controller unit sits on a shelf under Durango.  Incidentally, the shelf also houses the NCE DCC system and power supply.

Placerville Warehouse A

I recently obtained a kit for the Old Placeville Warehouse A, which was located along the Rio Grade Southern right-of-way, behind the Placerville Depot.  This kit is a laser-cut kit sold by Narrow Gauge Colorado.  The kit consists of laser board, cardstock, plywood and basswood parts.  Unfortunately, my kit did not come with instructions, but did have a mini-CD with photos and PDF renderings of the construction of Warehouse B.  The only time that I felt the instructions were required was in the layering of the parts for the windows, which are the same (or similar) in the two buildings.  The rest of the construction was very intuitive, and all parts fit together perfectly.

I was able to find a single color photograph (Dorman, R. D.  1999.  Rocky Mountain Railroads:  The Rio Grande Southern I.  R.D. Publications, Santa Fe, NM) in which the corner of the warehouse was shown.   I first painted the model with Rust-O-Leum Flat Black, followed by Rusty Metal Primer, which gives a nice rusty color.  The doors, windows and trim were painted using Rust-O-Leum Spruce Green and Clean Metal Primer.  The color of the doors and trim was a guess, but I find it to be a pleasing combination.  Following assembly, the building was weathered using one of my favorite products - Pan Pastels!


Old Placerville Warehouse A.  This is the trackside of the warehouse, located along the RGS right-of-way.

The side and end view of the Old Placerville Warehouse A.

Old Placerville Warehouse A.  Both ends are identical.  The back side of the warehouse has no doors.

Wednesday, March 4, 2015

Track Plan for the Rio Grande Southern

I have been designing a track plan for my new Rio Grande Southern layout.  The plan was created using Cadrail 10, and is shown in the diagrams below.
 
The portions of the layout represented on the plan between the Silverton (staging) area, through the Durango Yard, and continuing to the connection with the Rio Grande Southern have been completed, and trains are running.  The area shown in red, from Durango through Ridgway, is tentative, and subject to change as the layout progresses.

Stock pens constructed from a Banta Modelworks kit have been recently installed in Durango.  The town of Dolores will definitely include the American Model Builders Dolores Depot, and the Raggs... to Riches?  Dolores Section House and Conoco Oil Depot.  Rico will feature my scratchbuilt model of the Pro Patria Mill.  Kits for Vance Junction, Ophir, and Ridgway have been purchased, and some have been completed.

The Rose-Walsh Smelter kit (also from Raggs...to Riches?) is tentatively shown in the first plan outside Durango.  My current thinking is that there is no way I can devote space to the ASARCO refinery that was located behind Durango, so the Rose-Walsh Smelter may be a suitable stand-in.  The prototype of the Rose-Walsh smelter was located in Silverton, and is MUCH smaller than the ASARCO refinery that was actually located in Durango.  The later versions of the plan show the Rose-Walsh Smelter in Silverton, and may change again as the plan progresses!

The spur at the upper left corner of the plan will serve the Mission-style Western Colorado Power plant.  My late wife and I were able to take a tour of this plant as a feature of the 26th National Narrow Gauge Convention held in Durango in 2006, so I definitely want to include this building on the layout.

I have decided to include the different versions of the plan as it progresses, as it will show how the plan evolves.  I hope that you enjoy seeing the plan unfold!

Note:  the newest plan will always be at the top.


Rio Grande Southern v1.3.  The peninsulas containing Dolores and Rico have been extended an additional foot, and Ophir has been moved from a peninsula to the corner of the room.  The spur to the stock pens in Durango has been included.

Rio Grande Southern v1.2.  The track alignment in Dolores has been adjusted for better interest, and the Conoco plant is located in Dolores following relocation of the stock pens to Durango.

Rio Grande Southern v1.1.  Proposed benchwork is shown in red, with a mainline connecting various locations on the Rio Grande Southern.
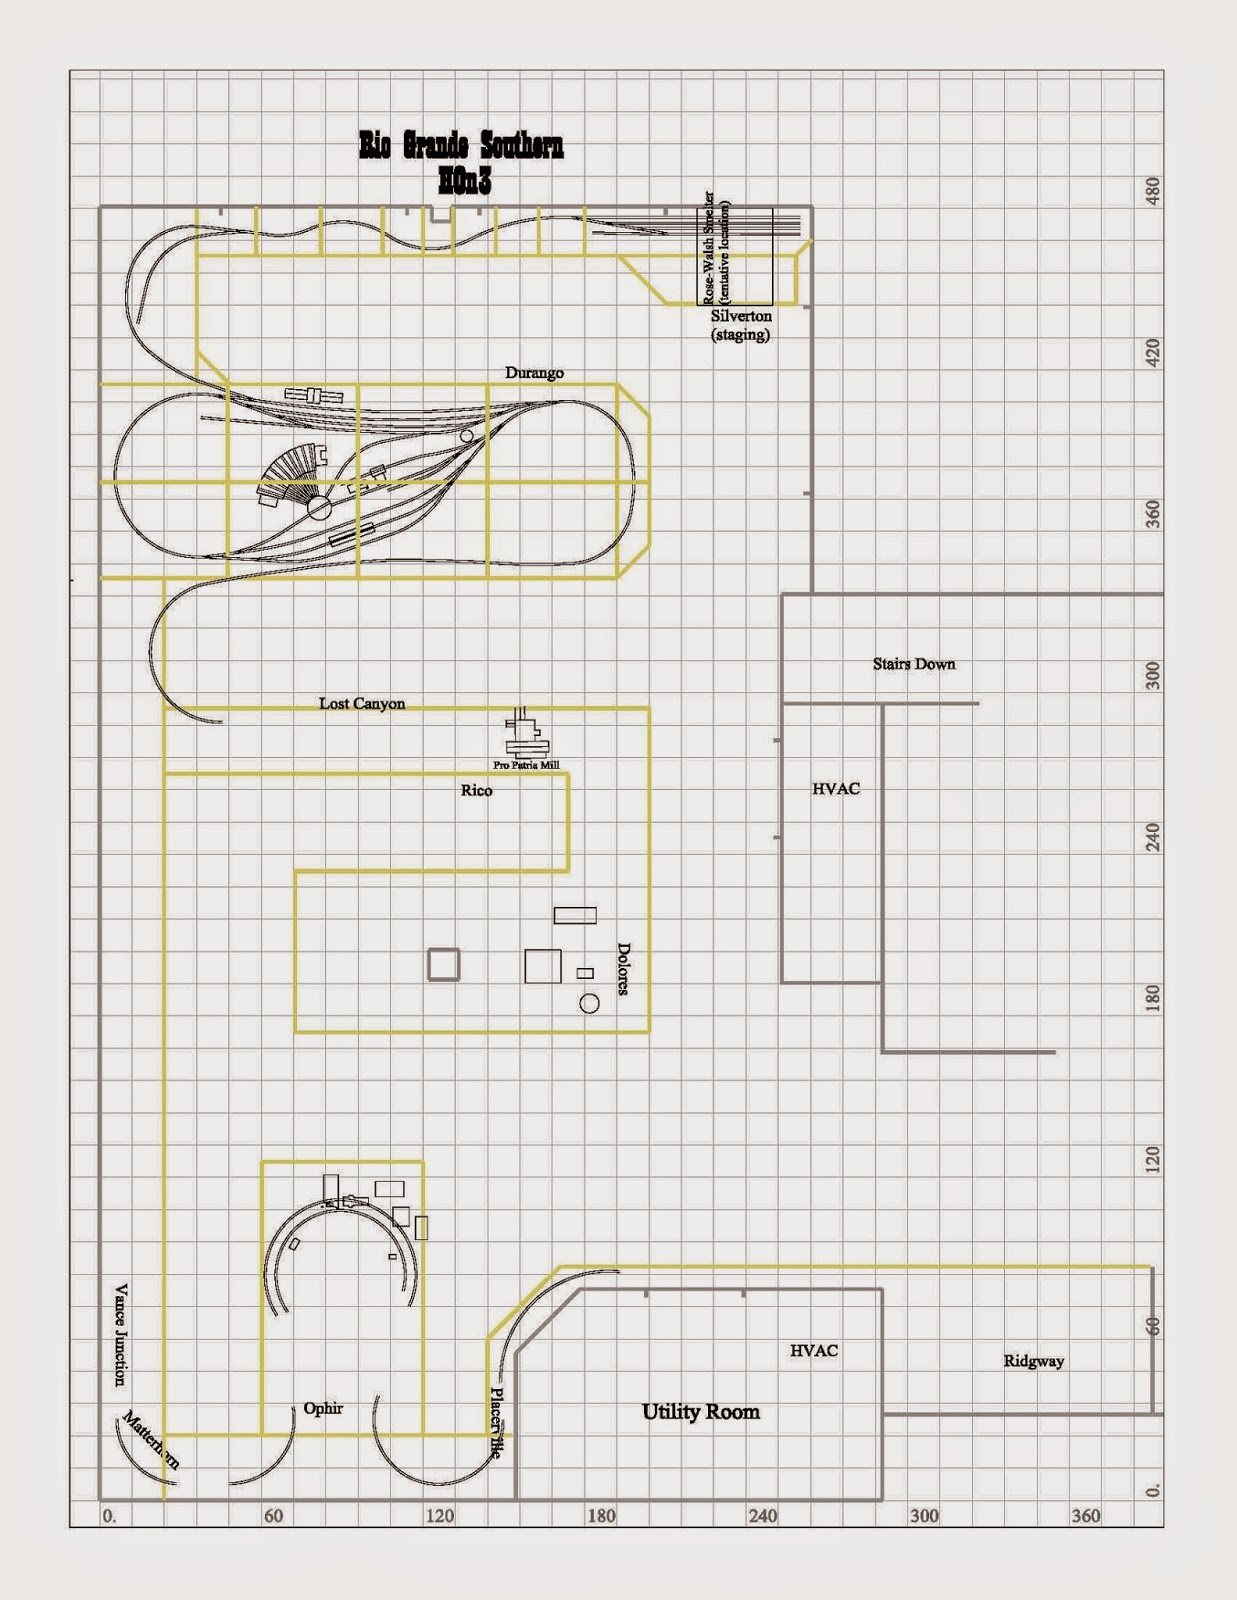
Rio Grande Southern v1.0.  At this point, the section from Durango to Silverton has been constructed, and certain locations on the Rio Grande Southern have been tentatively located.


Monday, February 23, 2015

More Structures for Ophir

I seem to be taking a longer break from the Durango Yard than I originally anticipated.  It may be a form of procrastination, because the next step is finalizing the track plan to Dolores, and then building benchwork!

Meanwhile, I have completed three more structures for my Ophir Loop portion of the layout.  These were all built from Banta ModelWorks kits:  the toilet and handcar shed, and the Oilton Club Saloon.

The toilet and handcar house were painted using standard RGS colors, Jersey Cream and Brown, which are available from PBL.  These are similar to, but not the same as, the D&RGW Depot Buff and Brown.  Exposed wood parts were stained using Hunterline  Creosote Black.  All parts were painted or stained while still attached to the carrier sheets to effect a cleaner look.  I did have a couple of minor problems with the toilet and handcar shed.  The laser cut windows and doors were cut too close to the edge of the the plywood, so I had to do a bit of repairs.  The handcar shed did not come with shingles, so I simply used leftover shingles from the Ophir Depot kit, and stained them with the Creosote Black.  Yes, I have constructed the Ophir Depot!

The Oilton Club Saloon was stained using Hunterline Cottage White stain for the walls, Dark Green acrylic paint for the trim, and Creosote Black for exposed wood, such as the stairs.  The kit includes silkspan for roofing.  I cut the silkspan into four-foot wide pieces, which were installed vertically using Aleene's Original Tacky Glue.  The roof was then painted with Polly Scale Grimy Black, and, when dry, weathered using Pan Pastels.  The only glitch in assembling this kit was that the two short doors were not included.  I was able to scatchbuild the doors from leftover plywood from the kit.  The instructions made no mention of the boarded-up window, and there is no window included in the kit for that location.  Photos show that this window was boarded-up at some point, so that is how I handled that window.


The three new structures for Ophir Loop, from left to right, they are:  the toilet, the Oilton Club Saloon, and the handcar house. 

The Oilton Club Saloon, with it's boarded-up window.
Well, back to working on the Durango Yard.  I need to repair moving damage to the turntable handrails (very fragile!), and I need to attach the Roundhouse roof.  However, before the roof can be attached I need to update or replace some of the microlights in the Roundhouse as some appear to have ceased working.  Also, some minor (I hope!) grading work needs to be done on the track over the ashpit.

Monday, February 16, 2015

The Ophir Tram House

I have taken a break from working on the Durango Yard, and constructed the Ophir Tram House.  This model was built from a Banta Modelworks kit.  The kit consists primarily of laser cut wood parts and corrugated metal siding.  The following photos show certain stages in construction.  All wood parts were stained on both sides using Hunterline Creosote Black stain.  The corrugated metal was first cut to size (1 3/8" tall, and then into panels 11 ridges wide).  The corrugated metal was attached to corrugated cardboard sheets using double-sided Scotch tape.  The corrugated metal was then sprayed with Rust-O-Leum Clean Metal Primer, and when dry, sprayed with Rust-O-Leum Flat Black.  Once dry to the touch, the panels were baked at 250 degrees for two hours to set the paint and prevent chipping.  NOTE:  Scotch tape distorts badly when heated.  Use double-sided masking tape instead!

A quick note about weathering is in order.  I weathered the corrugated metal following installation to the model.  The building was weathered using Pan Pastels, which are available from Stoney Creek Designs.  I used rust and gray to achieve the rusty weathered look of the prototype.

I deviated from the kit instructions in two ways; these will be discussed in the photo captions.


This photo shows the tram house itself following assembly of the framing and interior scribed siding.  This is the first deviation from the kit instructions.  I decided to glue the laser cut framing to the scribed interior siding prior to assembly of the walls to form the tram house.  It seemed to me that this would ensure that the parts fit together properly.  All parts fit perfectly, and I was happy with my modification.

This is the completed roof assembly ready for installation of the corrugated roofing material.

This view is of the base which has etched guidelines for placement of the completed bents.  This is the second deviation from the kit instructions, where I installed the bents to the base rather than to the completed tram house.  I would recommend following the instructions in this case, as it would have been easier to glue the bents to the tram house first.

The "completed" Ophir Tram House.  The Ore delivery chute is not installed, because the chute is braced to an outhouse located under the tram house.  Once the outhouse is constructed, the chute will be installed.

Another view of the tram house.  Note that the end is not square with the sides of the building, adding interest.

The other side of the Ophir Tram House.

Thursday, January 29, 2015

Ballasting Track

I have started the scenery on the layout, beginning with track ballasting.  I am starting with ballasting because the Durango Yard was covered in cinders, and it made sense to do the ballasting and the ground cover in the yard at the same time, since it used the same materials.  I started by using sanded tile grout, but completed the project with two products from Scenic Express (http://www.sceneryexpress.com):  Light Cinder Blend (fine), and #50 Dark Gray Ballast.  I used the #50 Dark Gray Ballast for the majority of the yard, with a light uneven application of the Light Cinder Blend for variation.  These products are easy to install, and provided the gray ballast color that I wanted.  All of the ballast was secured using diluted Matte Medium, which I diluted at a ratio of 1 part Matte Medium to 4 parts water.  I used a few drop of Jet Dry (available in the grocery store in the dishwasher soap aisle) as a surfactant, reducing the surface tension of the diluted Matte Medium and allowing it to penetrate the ballast and cinders.

Once the ballast dried, I cleaned the track thoroughly using a steel bristle brush.  I am using Code 55 Flex Track, and the rails need to be very clean with no particles of ballast adhering to the web of the rail.  The steel bristle brush made quick work of cleaning the sides of the rails, and also removed any ballast grains that found their way to the tops of the ties.  Once the track was scrubbed clean to my satisfaction, I then used a track cleaning block to polish the tops of the rails.  All turnouts were thoroughly cleaned to ensure that they moved freely.  I found that the Matte Medium did glue some turnouts in place, but it was easy to free them up mechanically.  I then test ran all freshly ballasted track using my Galloping Goose #7, because it is very sensitive to interruptions in track power.  The countryside adjacent to the yard area has been sceniced using tile grout, ground granite (from drilling my well), and various ground foams.  This scenery will be modified as the Durango area is filled with structures, but at least it looks better with scenery!

Astute viewers will note a change in the track arrangement to the left.  I made a compromise with the track connecting to the Rio Grande Southern.  This track serves as both a connection to the D&RGW eastbound and the westbound RGS.  Yes, a willing suspension of disbelief is required.  Because of this compromise, the track grade climbs, as per the D&RGW, rather than descends, as did the RGS.  I chose to do this because it allowed a more visual separation of the two tracks in the yard.  Just another compromise that we modellers must make!

Also, I have installed the Durango Water tank (a Durango Press [JL Innovative Design] kit), the Durango Sand House (Campbell Scale Models), and Handcar Shed (also Durango Press).  These remain to be 'dirted in' using the cinders and vegetation.


An overview of the Durango Yard.  The water tank, ashpit, coaling tower, turntable, and roundhouse are permanently installed, and ground cover has been applied to the surrounding area.


Rio Grande Southern K-27 461 taking water at the Durango water tower.  The yard has been ballasted, and the surrounding countryside has been sceniced.  All track has been scrubbed clean with a steel bristle brush.


D&RGW K-28 476 is being coaled at the Durango coaling tower.


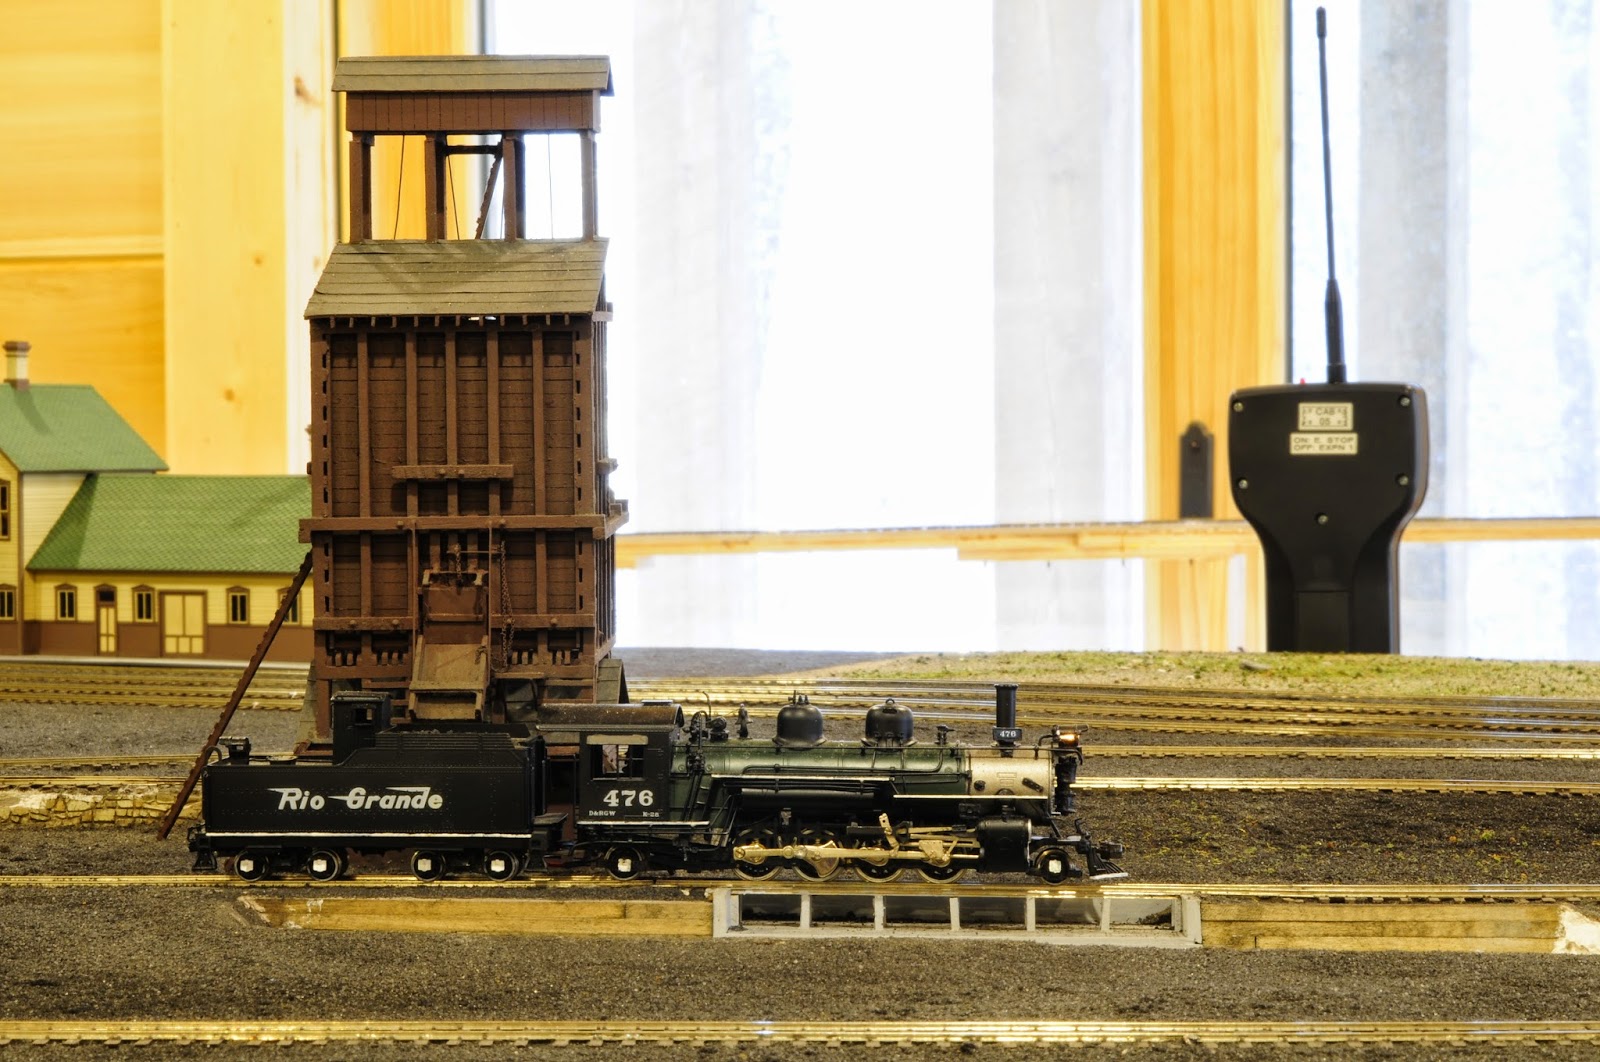
D&RGW K-28 476 has just finished receiving its load of coal in Durango.


Rio Grande Southern 461 is preparing to leave Durango following being watered.


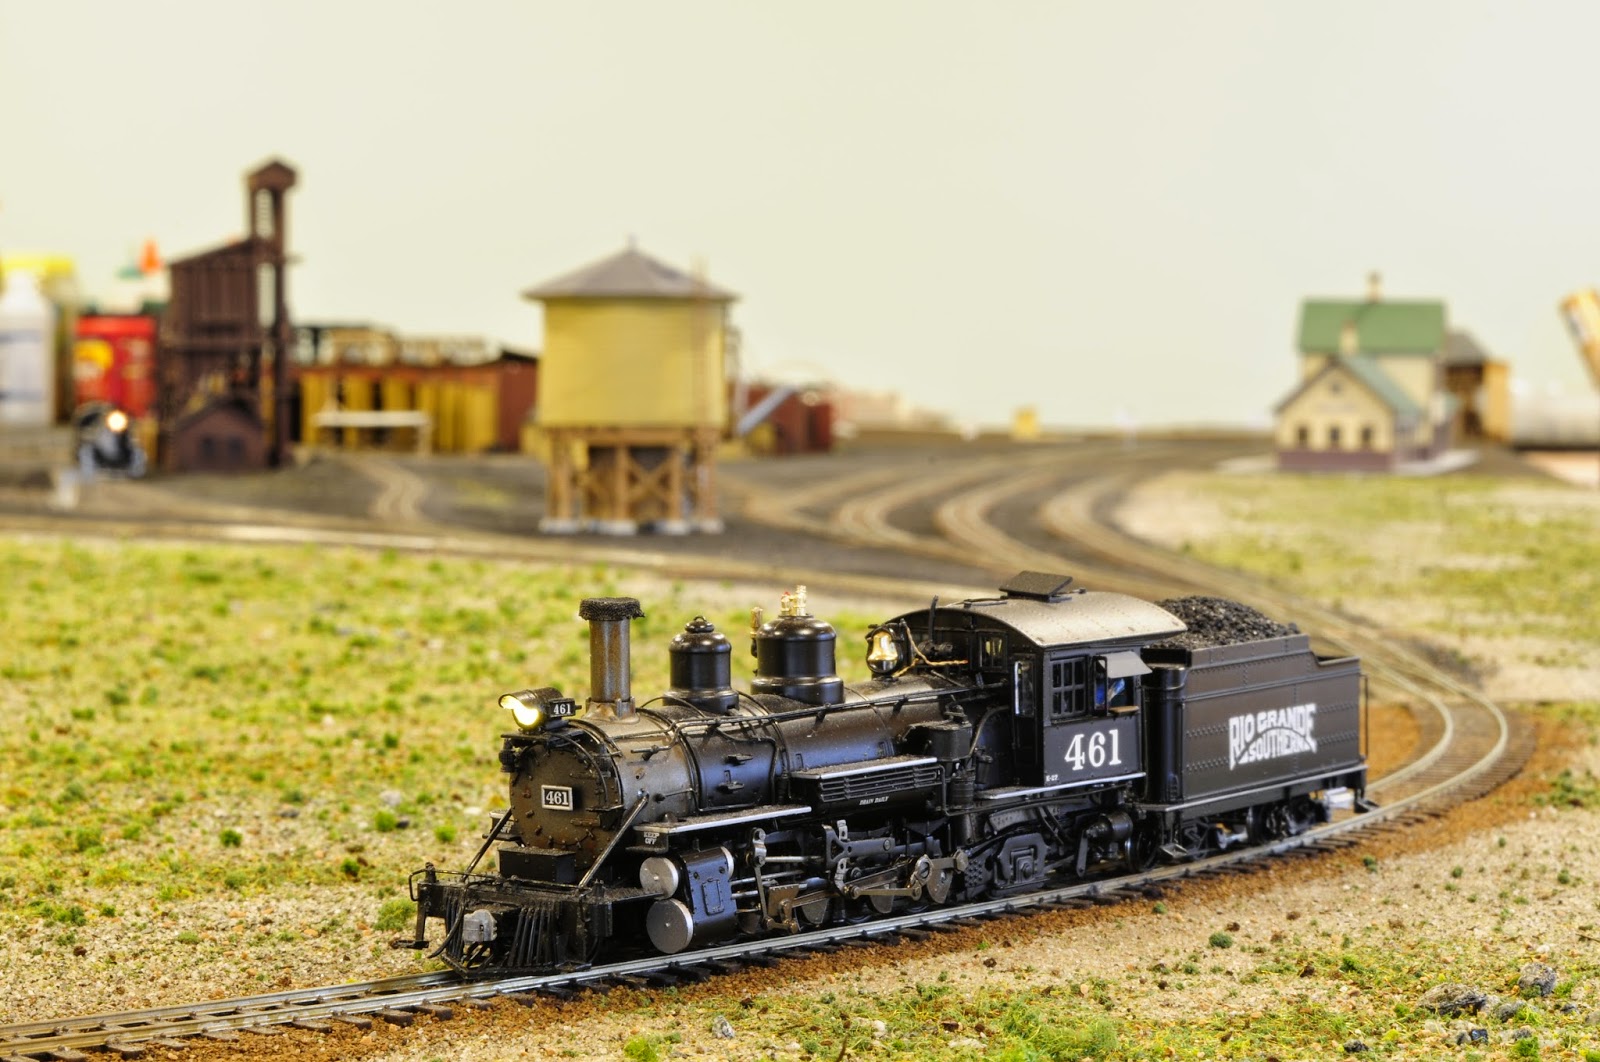
RGS K-27 461 leaves Durango, traveling light.

Monday, January 26, 2015

Wiring with DCC

As with the previous layout, this layout will be controlled using NCE DCC (http://www.ncedcc.com).  When I dismantled the previous layout, I retained all electronic components.  This was a huge time- and cost-saving measure, and allowed me to get trains running quickly.  Once the track was installed in the Durango Yard and the Silverton Branch, I installed 14 gauge stranded bus wires for what will be District One and for the reverse loop.  I color coded the wiring for future troubleshooting, using red and black stranded buses for the District One wiring, and green and white 12 gauge stranded wire (because I had this on hand) for the reverse section.  I then dropped 22 gauge stranded feeder wires from every length of rail to the appropriate bus wires.  The reverse section was gapped on both rails at each end to completely isolate it.  The reverse section was connected to a DCC Specialties (http://www.dccspecialties.com) OG-AR auto reverse unit, and District One was powered via a DCC Specialties PSX-4 circuit breaker.  Details about wiring the previous layout, which are applicable to this layout, can be found at this link:  DCC for the D&RGW.

I added a control bus to the layout, even though the layout will be controlled via radio controlled throttles to provide a backup in the event the batteries fail, or more operators are present than radio throttles.