Monday, October 20, 2014

Track Laying Begins!


I have begun laying track on the new layout. On my previous layout, I hand laid the track using MicroEngineering Code 55 rail, on Kappler wood ties using MicroEngineering Small spikes.  However, I decided to use MicroEngineering Code 55 flex track on this layout for a couple of reasons.  First, the new layout is approximately four times larger than the last layout.  Second, I spent 25 years (part time) building the last layout and since I am now 62 years old, I decided that a more rapid rate of construction would be beneficial.  Therefore, I am building the layout using flex track, but I am building the turnouts using FastTracks assembly fixtures and supplies.


 The following materials are being used for track laying:

  1. MicroEngineering
    1.  Code 55 rail for turnouts
    2. Code 55 Flex Track
    3.  Micro spikes
    4.  Code 55 rail joiners
  2. FastTracks
    1. #6 Turnout Assembly Fixtures 
    2.  24" and 30" radius Sweepsticks
    3. PC board ties
  3. Aleene's Original Tacky Glue
  4. Chalk
  5. Pushpins
  6. Straightedge
  7. Radius tool
Overview of the Durango Yard.  Note the installation of Flex Track and turnouts.  All trackwork is secured using Aleene's Original Tacky glue.


Closeup view of the yard tracks in front of the Raggs...to Riches Durango Depot.  Note that the yard tracks are curved, similar to the prototype, and that the Durango Roundhouse is now permanently mounted in the layout.


View of the major Durango Yard facilities.  The Car Repair Shops, in the foreground, has now been permanently installed into the layout.  Tracks have been laid up to, and through, the Car Repair Shops.


A view looking toward Durango, and the connection to the Rio Grande Southern Railroad on the left.  The track is slightly elevated on Homabed roadbed to provide separation from the Durango yard tracks.


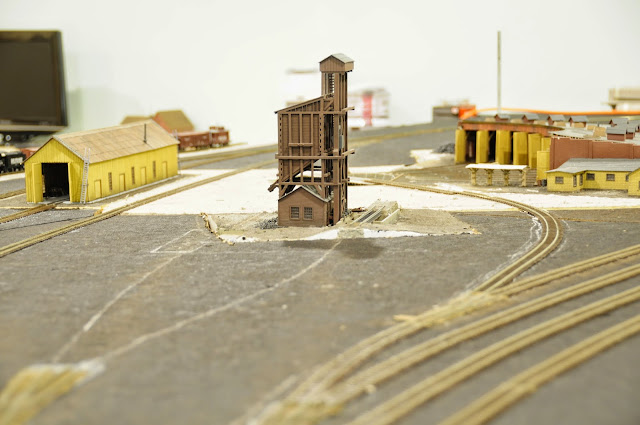
The Coaling Tower, relocated from my previous layout, is in place, but not permanently installed.  Permanent installation awaits excavation for the ashpit, located on the left side of the coaling track located to the left of the coaling tower.  The track to the right of the tower is the receiving track for coal, and will be elevated.


A Rio Grande Southern stock train arriving in Durango.  This is the slightly elevated track that serves as the connection to Ridgway, Colorado.  The locomotive is a Blackstone Models C-19, while the stock cars are Grandt Line kits built be the author.
Aleene's Original Tacky Glue, used for track laying.

Thursday, October 2, 2014

The Phoenix Arises


I have, at last, begun construction of my new HOn3 layout.  The past several months have been spent in finishing the basement, including the addition of an HVAC system, bathroom, workshop, utility room, and layout room.  The layout room itself is approximately 22' by 45', with an additional 4.5' by 9' area which will house my version of Ridgway, Colorado.  As with the previous layout, this layout will be built in HOn3, will include Durango, Colorado, and will be set in approximately 1948.

I have received track planning help from several friends, particularly Steve King and Larry Nyce.  Thanks, guys!  Although the total plan is not finalized, I completed the area that will be occupied by Durango.  I added a line to represent Silverton, which will be mostly staging, but there is enough space to allow for switching activity.

I began, of course, with construction of the benchwork using standard 1x4 lumber.  Normally, I would cover the Durango Yard with plywood and Homasote.  Unfortunately, in the part of North Carolina where I live (Western NC mountains), the standard response at every lumber yard I visited to the question "Do you carry Homasote?" was "Hunh?  What's Homasote?"  Obviously, if I was to build this layout, an alternative needed to be found.

A friend on the Southeast side of Charlotte recommended a product available at Home Depot called Quietbrace.  This is a 1/2" fiber panel that is covered with a very fine layer of asphalt.  I ordered several sheets of Quietbrace and 1/2" Sandeply plywood, and the benchwork for the Durango Yard, and the Silverton staging area was constructed.


Benchwork for the Durango Yard.  The black material is 1/2" Quietbrace.  The white lines are track centerlines drawn on the Quietbrace using white chalk.  The loop is the track used by the prototype to turn the San Juan passenger train.  The white track centerline exiting the photo to the right leads to Silverton staging.

Once all of the benchwork for Durango and the Silverton Branch was completed, I began transferring the track centerlines from the track plan to the railroad.  I found that I needed to make some changes to the track plan as I proceeded, mostly to more accurately represent the prototype track arrangement in Durango.  By the way, I made extensive use of the Durango Workbook published by Mike Blazek  (http://blazeksplan.com/). 


Durango yard track centerlines in front of the Durango Depot.  The depot was built from a Raggs...to Riches kit.  The roundhouse in the foreground was scratchbuilt by the author and moved from his previous layout.  The line to Silverton can be seen in the background in front of (and blocking!) two sliding glass doors.
The Durango Yard showing track centerlines, the scratchbuilt roundhouse, and Depot.  The scratchbuilt car repair shops are located on the left.  It is attached to a base, which will be recessed into the yard, and tracks will be laid up to it.
An overall view of the Durango Yard.  The loop in the foreground is not the loop for turning the San Juan, but, rather, is the Eastbound track out of Durango.  It had to be looped because of space limitations.  At the far left rear of the photo, the track will continue to the left onto the Rio Grande Southern, and eventually to Ridgway.


Looking from the Rio Grande Southern connection into the Durango Car Shops.
Installing the trackwork is next!  I will be using Flex track, but will be building my switches using Fast Tracks fixtures (http://www.handlaidtrack.com/).